.png)
Menu Builder - Miscellaneous
The Miscellaneous tab provides several different options for the menu being built. Select the menu style and where it displays on the screen, as well as other settings described below.
Miscellaneous
Menu is Enabled
This check box shows whether the menu has been disabled or is still an active menu. A check in the box signifies that the menu is enabled (active).
Don't close menu after running a macro (Popup menu only)
Select this option to keep the menu open after running a macro from the popup menu.
Don't allow menu to be closed (Floating menu only)
This option keeps the floating menu open with no chance to click on the red X or press Alt + F4 to close it. The menu may still be closed from the Macro Express - Explorer window by disabling the floating menu.
Menu Style
Use this option to select what information to display in the popup window. To more readily identify the macros placed in the popup menu, the macro information may be displayed in several different ways - Icons Only, First Part of the Macro, Nickname and Scope or Windows Default.
Icons - Horizontal
This option displays the icons assigned to each macro in the menu. The icons are displayed horizontally. The maximum number of icons displayed in a single row is 20.
![]()
Icons - Vertical
![]() This option displays the icons assigned to each macro in the menu. The icons are displayed vertically. The maximum number of icons displayed in a single column is 20.
This option displays the icons assigned to each macro in the menu. The icons are displayed vertically. The maximum number of icons displayed in a single column is 20.
Menu Icons
When using menu icons, select from the drop down list the size of the icons to appear in the popup window or floating menu. The sizes are listed in pixels. The icon size options are 16x16, 24x24, 32x32, 48x48, and 64x64 pixels.
Use Transparent Icon Backgrounds
Select this option to display the backgrounds of the icons transparently.
Clicking on the icon in the menu starts the playback of the macro.
First Part of the Macro
This option displays the first few words or commands of the macro script in the menu. When the popup window appears, either double click on the macro or press the number or letter associated with the macro to have it play back.
Nickname and Scope
The Nickname and Scope option displays the name assigned to the macro and the macro scope, such as a global, or program or window specific macro. When the popup window appears, either double click on the macro or press the number or letter associated with the macro to play it back.
Windows Default (Popup menu only)
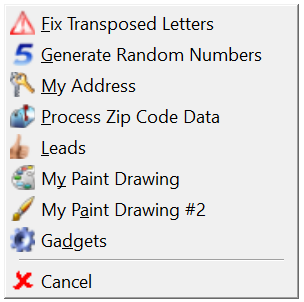
The Windows Default menu displays the icon associated with the macro and the macro nickname. Click on the macro to start the playback. Also assign accelerator keys to the macros using the Set Accelerator ![]() button. Pressing the A key activates the My Address macro in the example below. The accelerator keys are underlined and displayed to the left of the macro name.
button. Pressing the A key activates the My Address macro in the example below. The accelerator keys are underlined and displayed to the left of the macro name.
Menu Positioning
Determine where to display the menu when activated.
Display the Menu under the Mouse
This option displays the menu underneath the current position of the mouse cursor. The upper left corner of the menu is positioned under the mouse cursor.
X, Y
Enter the X and Y screen coordinates where the popup menu should be displayed on the screen. The default is to display in the upper left hand corner of the screen with coordinates of 0,0.
Place an Icon in the Notification Area
This option is only available for the popup menu. The icon associated with the popup menu is placed in the notification area. A left mouse click on the icon displays the popup menu.
üNote: The scope of the menu is set to Global when this option is selected.
Transparency
When using any of the menu styles, other than Windows Default, optionally set the transparency level of the menu. The transparency setting enables viewing the text or image underneath the menu when it is displayed. Moving the slider to the right makes the menu image more transparent.